All of these Tuesdays are just flying by, and I’m excited to offer another Technology Tuesday post… How to Take a Video of Your Computer Screen!

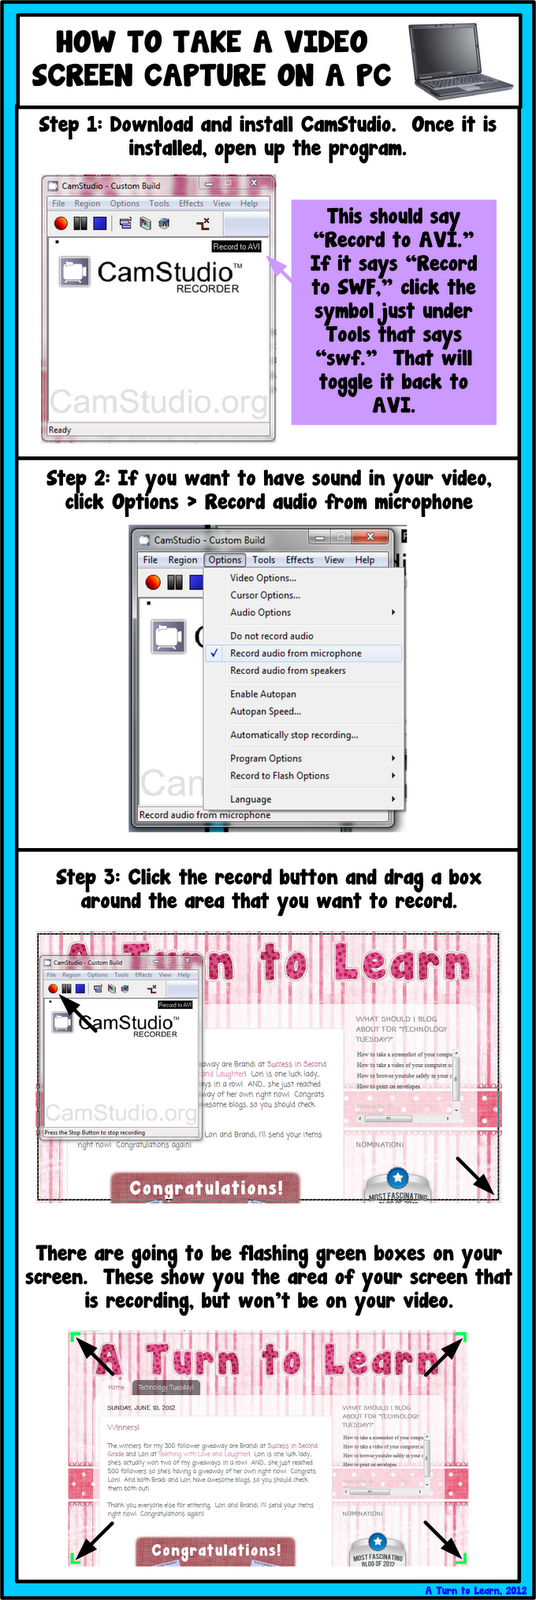
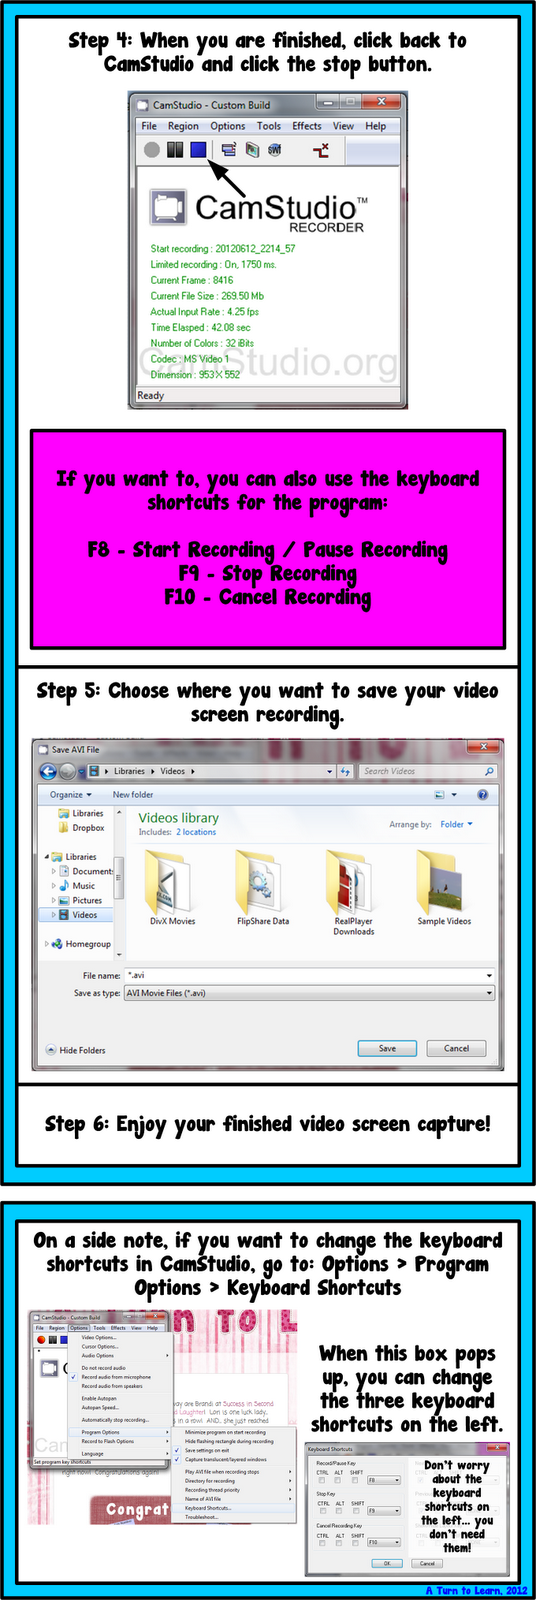
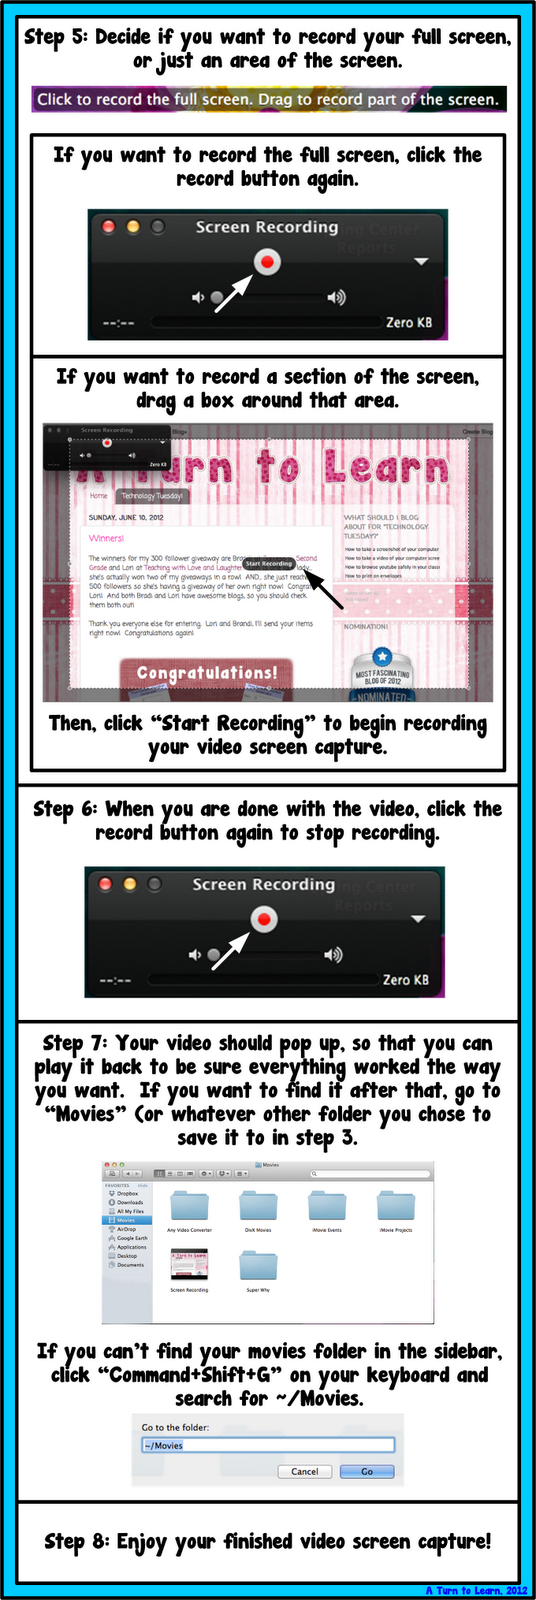
Now, if you’re doing this on a Mac or a PC, you’re going to need two different programs… so I wrote up a walk through for each program! I’m posting the PC tutorial first, but if you’re looking for the Mac tutorial, keep scrolling down!
The PC tutorial requires the free program CamStudio, which you can download for free here.


Now… onto the Mac tutorial!


Enjoy!


YOu are so awesome!! I love reading your posts and learning something new each week:)
Aloha,
Corinna
Surfin' Through Second
Thanks for the sweet comment!
My gosh you are fabulous! Thank you SO much for this! I have been wondering how people have been doing that!!!
Shanyn
Coffee, Kids and Compulsive Lists
Aww… thanks! I hope you're able to try it and make some use of it as well!
I love these weekly posts! I voted for this one so I was very excited to see that this was the topic for the week. Thank you so much for sharing this tutorial! 🙂
Lisa
Learning Is Something to Treasure
Thanks so much for voting! I was really excited to finally blog about this!
Thank You…How do teachers use this? I'm thinking I'll make videos about certain apps and programs I want my students to use. Then they can visit the video after I've given whole group instruction. (is there anyway to post videos on a blog? I do have a web site, but it's easier to post updates to a blog then my website)
How do you make the borders around your tutorials? I'm assuming you're using word or some photoshop program?
❤Pat
A Time to Share & Create
♬ MY WEBSITE
Fabulous 4th Grade
That's an awesome idea! I haven't used this with my students, only with the other teachers at my school to walk through how to do certain things on the computer… and I actually haven't even uploaded those videos to my blog! Oops! I love the idea of using it to walk students through how to use a certain program or how to browse around a certain website.
There is a way to post videos to your blog, here's a bit of info on that:
http://support.google.com/blogger/bin/answer.py?hl=en&answer=67428
I make the borders in Microsoft Visio by layering boxes on top of each other. You can achieve a similar effect in Word or Powerpoint by using two text boxes/shapes, one with the color in it, and one on top of it that you type the text into. Let me know if you try it out!
Thanks!
Thank you for this! Great tutorial 🙂
~Stephanie
3rd Grade Thoughts
Thanks! 🙂
Thanks for introducing me to Gimp, it's awesome. Do you have any tutorials posted on how to use it?
🙂 Dana
Stop by & visit me @ Fun in 1st Grade
Right now I just have the tutorials for making a transparent background and superimposing text over an image, but I plan on adding a lot more!
Great! I can't wait. I was trying to make something last night, but just couldn't get it like I wanted.
These are the best tutorials! Thank you so much. I always thought I needed a fancy program to do this.
Connie
Thanks! Sometimes things are way easier than they seem which is what I love about technology! It's always nice to find an easy way to do something!
I just discovered your blog and I am so excited. I am always looking for ways to learn more about using technology and your step by step format makes it so easy. Thank you so much!
Julie
Thank you for your sweet comment! I'm glad it makes it easy and I hope you were able to find lots of new ways to use technology! 🙂
Thanks for sharing this! I've been wondering for a while how to do this and just stumbled upon your wonderful blog! I'm your newest follower, stop by my blog when you get a chance.
Laura
Mrs. Castro's Class
No problem! I'm glad you stumbled over here! I'm going to go check out your blog now as well!
Thanks for all the great tutorials. I'm your newest follower.
Mercedes
Surfing to Success
Thanks for following! I love your blog's name, I'm going to go check it out now!
You are wonderful! I REALLY appreciate all your tutorials!
Is there a time limit on recording? Also, what program do you suggest for audio recording? I need to record books onto a CD.
Again, thank you for all you do! I look forward to reading your posts!
Patti
One Class, One Sound
Thanks for the sweet compliment! I don't believe there's a time limit, but that will also depend on how much space in on your hard drive I think. I had accidentally left CamStudio up for an hour by accident and it just kept recording!
For audio recordings, are you using a Mac or PC?
I use MAC at home and PC at work. The recordings would be done on either computer.
For the Mac, you can use QuickTime similar to this tutorial, just choose "File > New Audio Recording" instead of "New Screen Recording." For the PC, there's a free program called "Audacity" that lets you take audio recordings.
Here's the link for audacity: http://audacity.sourceforge.net/
I'm pretty sure Audacity runs on Mac too, if you want consistency between the two computers. That's up to you though! I'm definitely going to add it to my list of things to blog about. It may take some time for me to get to it, but it'll definitely be on my list. In the meantime, let me know if you have any questions/problems playing around with it!
Thank you so much for the information!
No problem!
I recorded audio with Quick Time. What format would I use to burn to a CD? It automatically saved as mpeg4 and that will not play on a CD player.
Patti